Unlike Windows XP, Windows 7 doesn’t automatically grant full access to directories and files if you log in as a system administrator. To gain control of a drive or directory and its contents you can perform the following steps:
Tag: Windows
How to Dual Boot Windows 7 and Linux using BCDEdit
(20141224 – This post has been amended to address changes in recent versions of Ubuntu, and to remove outdated instructions — iceflatline)
This post will describe how to use the Window 7 boot configuration data editor (BCDEdit) to configure a Windows 7 system that can boot to Windows 7 or a Linux distribution. The steps described in this post assume that Windows 7 and the Linux distribution will occupy the same physical hard drive. Configuring BCDEdit to recognize and boot a Linux distribution located on a second physical hard drive is beyond the scope of this post.
To help explain the steps involved, we’ll use an 320 GB SATA hard drive with Windows 7 already installed. We’ll reduce the size of the partition containing the Windows 7 operating system and re-partition the remaining unallocated disk space in order to install the Linux distribution Ubuntu. We’ll then use BCDedit to add a Windows boot menu option for Ubuntu. All steps involved assume you have a functioning CD drive (or USB drive if you’d prefer) that the system can boot from. The software versions used in this post were as follows:
- Ubuntu v14.10 (x64)
- Windows 7 Professional (x64)
Oh…, and while I’ve never encountered a situation where the Windows 7 Disk Management tool destroyed existing disk data, make sure you backup any critical files before you proceed.
So, let’s get started.
Reducing the Windows Partition
The first thing that we need to do is reduce the size of the existing Windows 7 partition. While you can use third-party applications like GParted, I found Windows 7’s own Disk Management tool to be the most efficient method for accomplishing this task. The Disk Management tool can be accessed by using Win+r and entering the command diskmgmt.msc.
You’ll notice that Windows 7 currently occupies all of the existing disk space using two primary partitions: one small boot partition; the other for the operating system. When finished, we’ll have five partitions in total: the two Windows 7-related partitions just mentioned, and ones for the Ubuntu operating system and Linux swap. We’ll also create a small FAT32 partition for sharing data between Windows 7 and Ubuntu. You’ll need to determine how much space you want to allocate to each of these additional partitions based on your requirements and disk size. For our 320 GB disk example, we’ll use the following partition layout:
Windows 7: ~100MB (Windows 7 boot loader)
Windows 7: ~251 GB
Ubuntu: ~31 GB
Linux-Swap: ~1 GB
FAT32: ~16 GB
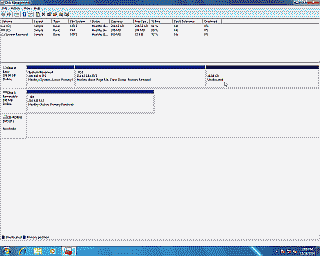
Right-click on the Windows 7 volume (C:) and selected “Shrink Volume.” Then enter the amount of space (in Megabytes) that the partition should shrink (which in turn becomes the amount of space available to install our Linux distribution), which in our example is 48000 Megabytes (48 Gigabytes), then select “Shrink” (See Figure 1). When complete, exit out of the Disk Management tool and reboot the system.
Installing Ubuntu
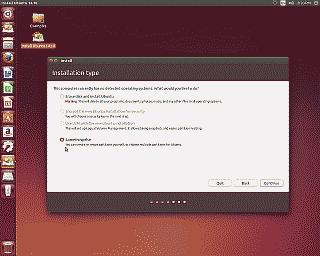
Now it’s time to partition our 48 GB of unallocatd disk space and install Ubuntu. Download a copy of Ubuntu Desktop and burn it to a CD (or place it on a bootable USB drive). Boot the system using the Ubuntu disk. Select “Try Ubuntu…” and then double-click the “Install Ubuntu…” icon when the desktop appears. Continue through the installation process until you arrive at “Installation type” and select “Something else”, then select “Continue”. (See Figure 2).
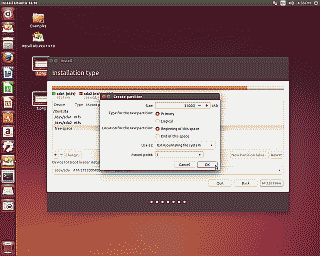
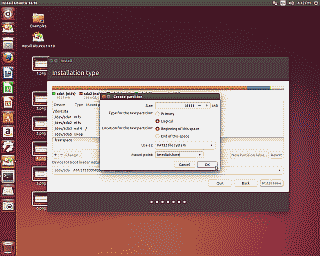
The screen that follows is where we’ll instruct Ubuntu how to partition the unallocated disk space. Left-click on “free space” to highlight it and then select the “+” icon to create a new partition. Make the size of this partition 31000 MB. Ensure it’s a primary partition, and located at the beginning of the free space. Select the Ext4 journaling file system and, since this partition will serve as the root partition for Ubuntu, set the mount point to / from the list of choices in the drop-down lists. Now select “OK” to accept the changes (See Figure 3).
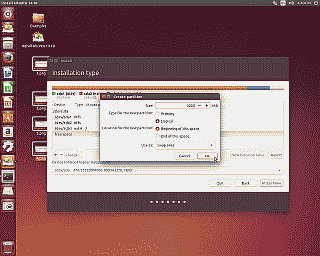
Now let’s create a partition for use as Linux swap space. Once again, left-click on free space to highlight it and then select the + icon to create a new partition. Make the size of this partition 1000 MB. Our disk is limited to a maximum of four primary partitions, so we’ll make this a logical partition – again located at the beginning of the free space. Select “swap area” from the list of choices in the drop-down list, then select “OK” to accept the changes (See Figure 4).
Using similar steps, let’s partition the remaining free space as a FAT32 file system. This too should be a logical parition, located at the beginning of the space. You may also wish to set the mount point to /media/share, or something similar. The benefit of selecting a mount point at this stage is that Ubuntu will add this partition to the file /etc/fstab so that the system automatically mounts it at boot time. No worries though, you can always select a different mount point and manually mount it and/or add it to /etc/fstab at a later time. When complete, select “OK” to accept the changes (See Figure 5).
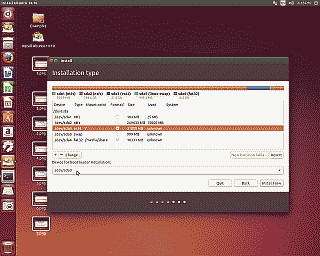
The final step is critical. We need to tell the Ubuntu installer where to install the system bootloader (GRUB 2). We DO NOT want to install the bootloader on /dev/sda, as that would overwrite our disk’s master boot record, nor do we want to install it on /dev/sda1 or /dev/sda2, as that would overwrite the Windows 7 bootmanager files and boot configuration data, or the operating system itself. Instead, let’s have Ubuntu install its bootloader on the partition that will contain the Ubuntu operating system – in our case /dev/sda3. To do this, click on the drop down list under “Device for boot loader installation” and select /dev/sda3 (See Figure 6).
Select “Install Now” and Ubuntu will begin the installation. When it completes you’ll be asked whether you’d like to reboot or “continue testing”. You should select continue testing as the following steps require access to a terminal.
Configure Windows for Dual Boot
Now that we have our disk partitioned and Ubuntu installed, let’s set up our system to boot Windows 7 or Ubuntu. This will involve copying the boot record of our Ubuntu partition to Windows 7, and using BCDEdit to create a new entry in the BCD store that will point to that file. This way Windows 7 will display a menu at boot time that will give you a choice between Windows 7 and Ubuntu.
First, let’s make a mount point for the FAT32 partition we created. Open a terminal and enter the following:
|
1 2 |
sudo su mkdir /mnt/share |
Next, let’s mount the correct device to this directory. Recall from the partitioning steps above that the FAT32 partition is located at device /dev/sda6:
|
1 |
mount /dev/sda6 /mnt/share |
Write the first 512 bytes of our Ubuntu partition to a file and copy that file to our FAT32 partition:
|
1 |
dd if=/dev/sda3 of=/mnt/share/ubuntu.bin bs=512 count=1 |
Note: using the FAT32 partition in the aforementioned steps is optional. You may chose to use another device such as a USB drive to copy the *.bin file to.
Exit out of the Ubuntu live system and reboot to Windows 7. Along the way, you may see Windows perform a disk check (don’t worry, that’s normal, and should only occur once as a result of these procedures). Log into Windows 7 and open the FAT32 volume you created and you should see the ubuntu.bin file. Copy that file to the root of the Windows 7 volume (e.g., C:).
Now we’ll use BCDEdit to add an entry to Windows 7’s BCD store. Administrative privileges are required to use BCDEdit, so use Win+r, type cmd, and then press CTRL+SHIFT+ENTER. Let’s start by creating an entry for our Linux distribution. Note here that you are free to choose another entry name if desired:
|
1 |
bcdedit /create /d “Ubuntu” /application bootsector |
BCDEdit will return an alphanumeric identifier for this entry that I will refer to as {ID} in the remaining steps. You’ll need to replace {ID} by the actual returned identifier. An example of {ID} is {d7294d4e-9837-11de-99ac-f3f3a79e3e93}. Next, let’s specify which partition hosts a copy of the linux.bin file:
|
1 |
bcdedit /set {ID} device partition=c: |
The path to our ubuntu.bin file:
|
1 |
bcdedit /set {ID} path \ubuntu.bin |
An entry to the displayed menu at boot time:
|
1 |
bcdedit /displayorder {ID} /addlast |
and finally, let’s specify how long the menu choices will be displayed:
|
1 |
bcdedit /timeout 30 |
That’s it! Now reboot and you will be presented with menu where you can choose to boot to Windows 7 or Ubuntu. When you choose Ubuntu, you’ll be taken to the it bootloader menu where you can choose to continue booting Ubuntu.
On a final note, if at any time you want to eliminate the Ubuntu menu option simply delete the BCD store entry you created using the following command:
|
1 |
bcdedit /delete {ID} |
Conclusion
With a minimal amount time and a little Windows command line foo, you can easily set up a system that can dual boot Windows 7 and your choice of Linux distributions.
References
http://technet.microsoft.com/en-us/library/cc709667%28WS.10%29.aspx
