News

Update to Creative Commons License

I have updated the Creative Commons Attribution license used on this site from version 3.0 to version 4.0. Version 4.0 features a number of improvements, primarily in the area of terminology that should now be better understood worldwide. What hasn’t changed is the rights granted by the license. Like its predecessor, the Creative Commons Attribution 4.0 license allows you to freely copy, distribute and transmit content made available on this site, to adapt it to something you may be working on, even make commercial use of the content. All I ask is that you attribute the original content to me in some way.

If you have any questions or seek additional information, please don’t hesitate to contact me.

News

Wither Mint

Back in 2012 I installed Mint, a self-hosted web site analytics program, to this site. Since that time Mint has been anonymously collecting information on about who is referring readers to this site, which posts are most popular, top searches, etc. Sadly, the Mint development team has announced that sales and support has been suspended. I have no desire to use software that isn’t going to be maintained so effective immediately I will no longer be using Mint on this site.

So what did I learn from Mint while in use?

  • This site receives on average 8,472 unique visitors per month.
  • Unsurprisingly most of the referrals to post on this site come from Google.
  • The top three posts in terms of popularity at the time of this post were:
    1. How To Create And Configure VLANs In pfSense
      How to Install and Configure MRTG on Ubuntu
      How to Dual Boot Windows 7 and Linux using BCDEdit
  • 58% of you use the Chrome browser, while 30% use Firefox. Safari and Internet Explore receive honorable mentions at 6% and 1% respectively.
  • At the moment I have no plans to replace Mint with another web site analytics program. Should I decide to do so I will let you know. Rest assured though that anything I may decide to use will not collect personal data of any kind.

    Hardware

    How to Remove Those Old Laptop Stickers

    Tired of those old stickers you adorned your laptop with? Me too. No, I don’t mean yours. I’m sure yours are fine; well, except for that Bieber Rocks! one. What were you thinking!? Anyway, here’s couple of tips on how to remove Bieber and his sticky cousins.

    Screenshot showing a Lenovo laptop with numerous stickers

    First, power down your laptop, unplug it, and close the lid. Try to remove as many of those old stickers by simply peeling them off. Some will come off cleanly, many won’t. Don’t worry if some of the residue is left behind. Now head to your kitchen and grab that good old no-stick cooking spray and apply liberally to a small section of the laptop surface. Don’t be stingy. The idea is to keep the area you’re working on soaked in the stuff for at least 10-15 minutes – the longer, the better though. Make sure to not let it run down the sides and creep into cooling vents, on to your keyboard, etc.

    Screenshot showing a can of no-stick cooking spray

    Now grab one of those plastic paint scrapers (emphasis on the word plastic here) you’d find at any big-box hardware store and start gently scraping off the remaining sticker residue, reapplying the cooking spray as necessary. Continue working your way across the surface of your laptop by applying the cooking spray, letting it soak in, then gently scraping.

    Screenshot showing a plastic paint scraper

    Once you’ve exhausted the capabilities of that paint scraper, any remaining residue can usually be removed with a little more cooking spray and a nylon scrubbing pad.

    Screenshot showing a nylon scrubbing pad

    This simple combination of cooking spray, gentle scraping and patience should remove those old stickers and any remaining residue they leave behind. If for some reason the cooking spray isn’t getting the job done for you then WD-40 or a citrus base adhesive remover like goo gone may be a good alternative. Both should be safe to use on your laptop but of course you should test these products first on someplace inconspicuous.

    Screenshot showing a can of WD-40

    Screenshot showing a bottle of goo gone

    As a final step gently clean off the surface of the laptop using a clean wash cloth, warm water and dish washing soap, then dry using a clean cloth or paper towel.

    Screenshot showing a Lenovo laptop after stickers have been removed

    There you have it. A couple of tips on how to remove those old laptop stickers using materials you can easily find around the house. Do you have more tips or ideas? Leave them in the comment section.

    Windows

    How to Install and Configure a TeamSpeak Server With a Different Voice Port

    (20200803) – The steps described in this post were amended to address changes in recent versions of software — iceflatline)

    TeamSpeak is a voice communication tool for online gaming, education and training, internal business communication, and similar use cases. This post will describe how to install TeamSpeak server on the Windows operating system, configure it to listen for incoming voice connections using a non-default UDP port, and test the installation/configuration using the TeamSpeak client application. Also discussed is how to remove your TeamSpeak server from the list of publicly available servers. The versions for the software discussed in this post are as follows:

    • Windows 10 Pro x64
    • TeamSpeak Server 64-bit 3.12.1
    • teamSpeak Client 64-bit 3.5.3

    Let’s get started…

    Install and Configure the TeamSpeak Server

    Start by downloading the TeamSpeak server and extracting the folder contained within the zip file to a location of your choice. We’ll use C:\ in our example. After the folder is extracted we should see the folder C:\teamspeak3-server_win64.

    Open this folder and create a shortcut to C:\teamspeak3-server_win64\ts3server.exe to somewhere convenient. Right-click on the shortcut, navigate to Properties, and append createinifile=1 to C:\teamspeak3-server_win64\ts3server.exe in the Target field (e.g. C:\teamspeak3-server_win64\ts3server.exe createinifile=1) then select “OK” to save and close the window.

    Double-click on this shortcut to start to start the TeamSpeak server, and accept the license agreement. You should now see a new icon in the notification area of the windows task bar indicating that the TeamSpeak server has started. When the TeamSpeak server is started for the first time a pop-up window will appear showing the Server Query credentials and the Server Admin Token (See Figure 1). You can disregard this information for now and close the window.
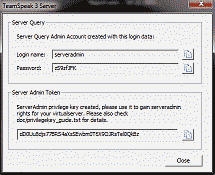
    Screenshot showing the Server Query credentials and Server Admin Token after initial TeamSpeak server startup

    Figure 1

    Now open the folder C:\teamspeak3-server_win64 and you should see several new files, including ts3server.ini and ts3server.sqlitedb.

    Stop the TeamSpeak server by right-clicking on the icon in the notification tray and selecting “Exit”. Delete the file C:\teamspeak3-server_win64\ts3server.sqlitedb. Open C:\teamspeak-3-server\ts3server.ini and change the value of default_voice_port value to the port number desired. We’ll use 12010 in our example.

    Once again right-click on the shortcut, navigate to Properties. Replace createinifile=1 with inifile=ts3server.ini in the Target field (e.g., C:\teamspeak3-server_win64\ts3server.exe inifile=ts3server.ini) then select “OK” to save and close the window.

    Restart the Teamspeak server using the shortcut and a new C:\teamspeak3-server_win64\ts3server.sqlitedb file will be created containing the new port number. The pop-up window showing the Server Query credentials and the Server Admin Token will again appear. This time you’ll want to copy at least the Server Admin Token somewhere as this key is needed to gain administration rights to your TeamSpeak server. I also recommend copying the Server Query credentials somewhere as well. This will be needed should you ever want to use ServerQuery, a command line based administration tool supported by TeamSpeak.

    Test Using the TeamSpeak Client

    Okay, now that we have the TeamSpeak server installed and configured let’s install the TeamSpeak client and test to ensure that you can connect to it.

    Download the TeamSpeak client application and install it. Start the TeamSpeak server and then start the TeamSpeak client. Once the TeamSpeak client has started select Connections->Connect (or use CTRL+s). In the Server Address field enter the host name of the Teamspeak server followed by the port number the server is listening on for incoming voice connections. These two entries should be seperated with a colon. Since our Teamspeak server is located on the same machine as the TeamSpeak client we’ll use the host name localhost. The port number will of course be the one we configured for this Teamspeak server, port 12010 (See Figure 2):
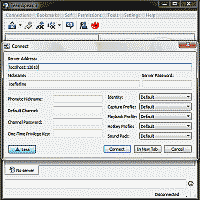
    Screenshot showing a new TeamSpeak server address and UDP port being configured in the TeamSpeak client application

    Figure 2

    Select “Connect” and you’ll will be connected to your TeamSpeak server. A window will appear indicating that this is newly created Teamspeak server and that the administrative privileges have not yet been claimed. Enter your Server Admin Token, then select OK. Note that this pop-up window will occur each time you connect to the TeamSpeak server until you’ve used the Server Admin Token. An unused Server Admin Token can be entered at any time after you’ve connected to the TeamSpeak Server by selecting Permissions->Use Public Key.

    Now that you’ve verified that you can connect to your TeamSpeak server locally, make sure to forward the correct UDP port (12010 in our example) in your NAT gateway so that, if desired, TeamSpeak clients outside of your local network can connect to your Teamspeak server.

    Generating additional Server Admin Tokens

    What if you want to add administrative privileges to another TeamSpeak client so, for example, you can administer the TeamSpeak server remotely? No problem. Using the TeamSpeak client you used previously to enter your Server Admin Token with connect to your Teamspeak server and navigate to Permissions->Privilege Keys and select “Create”. In the next window select Server Admin from among the options in the Group field. Enter a description if desired then select “Create” (See Figure 3). You can use this new Server Admin Token with another TeamSpeak client by connecting to the TeamSpeak server and selecting Permissions->Use Public Key.
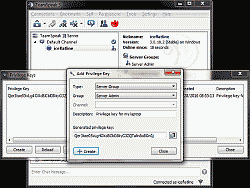
    Screenshot showing where to create a new Server Admin Token

    Figure 3

    You can revoke tokens at any time by navigating to Permissions->Privilege Keys, highlighting the desired token and selecting “Remove.”

    Prevent your TeamSpeak server from appearing in the public server list

    TeamSpeak servers are automatically added to a list of publicly available servers when installed. This may not be desirable. To remove your server from this public server list connect to your server using a TeamSpeak client with administrative privileges. Right-click on your server’s name and select Edit Virtual Server. Select the Misc tab and uncheck the option “Enable reporting to server list” then select “Apply” (See Figure 4).
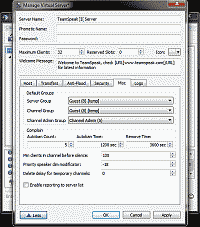
    Screenshot showing where to disable public server listing in the TeamSpeak server configuration

    Figure 4

    Conclusion

    Well there you have it. A post describing how to install TeamSpeak server on the Windows operating system. The developers of TeamSpeak should make it easier for server administrators to make simple modifications like changing the default ports. Until they do this article should help you make those changes.

    Windows

    Run a Windows Application as a Service with srvany

    Occasionally the need arises for running an application in Windows as a service. This allows the application to run at boot time without the need for a user to be logged into the system in order for the application to start and operate. While built-in mechanisms such as Task Scheduler exist to help facilitate this, the ability to run an application as a service has certain advantages, notably the ability to prescribe certain actions be taken should the service fail. Take for example the the case where an application is listening for incoming IP connections. Being able to automatically restart the service without user intervention is desirable in order to avoid loss of service.

    This post will describe how to use the Microsoft utilities instrsrv.exe and srvany.exe to install a Windows application as a service. instrsrv.exe is used to install the service while srvany.exe acts as a wrapper around the application and handles the service events. Both utilities are available as part of Microsoft’s Windows Server 2003 Resource Kit Tools. I have successful tested instrsrv.exe and srvany.exe on Windows 7/8.1; I have not tested them on Windows 10.

    Let’s get started…

    For purposes of example, we’ll assume we have a Windows application called “foobar” that is normally started by using the binary c:\foo\foobar.exe.

    Start by downloading Microsoft’s Windows Server 2003 Resource Kit Tools and install it to a folder of your choice. Create a folder to contain the files instrsrv.exe and srvany.exe. We’ll use c:\srvany for our example. Now copy both files from the where you installed the Resource Kit tools to c:\srvany. After the files have been copied the Windows Server 2003 Resource Kit Tools may be uninstalled.

    Now open a command prompt and install foobar as a system service using the following command. You may use any name you’d like for the service:

    You should receive a response indicating that the service was successfully added.

    Next, open the Windows registry editor and navigate to HKEY_LOCAL_MACHINE\SYSTEM\CurrentControlSet\services\foobar. Use the mouse or keyboard to highlight foobar and select Edit->New->Key to create a new key named Parameters. Highlight Paramters and select Edit->New->String Value to create a new string value named Application. Double-click on Application and enter the full path to foobar.exe (e.g., c:\foo\foobar.exe). That’s it. You can now close the registry editor.

    By default, the newly created service foobar is configured to run automatically when the system is restarted. To change this setting to Manual, run the Services applet by entering services.msc from a command prompt or by using WIN+R. Locate foobar from among the list of services, right-click on it and select Properties and change its Startup type to Manual. A service set to Manual can be started from within the Services applet, or by entering the following from a command prompt:

    Selecting the Recovery tab from within properties will allow you to chose what the system should do in the event if the service fails.

    You can delete the service by entering the following from a command prompt:

    There you have it. A nice simple way to register and run a non-service application as a windows service.