Category: BSD

The Unix category contains posts relating to installing and configuring applications, services and processes on BSD-based operating systems.

BSD

Using xargs

Recently I decided to update and re-tag my music collection, which had suffered at the hands of the untrained and uncaring for far too long. The album art in particular, comprised of various jpg files and scattered throughout the numerous artist and album directories, was incomplete and/or inaccurate. I decided I needed a way to quickly and efficiently remove this old album art before starting the re-tagging process. Enter xargs, a handy little utility in Linux and Unix operating systems used to construct a list of arguments for an arbitrary Linux or Unix command. xargs is a good companion for commands like find, locate and grep that output long lists of files. The general syntax for the xargs command is as follows:

Let’s take the case of the my superfluous jpg files to see how xargs might be used in practice. We’ll start by opening a terminal and using the find command to locate these jpg files. This following command should find files ending with “.jpg” anywhere within my music directory, including sub-directories, and list them to the terminal:

By the way, in this particular example I’m passing along a directory to the find command that I know in advance I have the appropriate permissions to access, in this case my home directory. However, depending on what you’re searching for and where, the find command may return “Permission denied” because it (or rather you) lack sufficient permissions to access certain directories and files. In those cases you’ll need to preface the find command with su or perhaps sudo in order to avoid these errors.

Also be aware that the locate command offers similar capabilities to find, but instead of searching through the system’s directories and files, locate searches through a pre-built database of these directories and files. locate can produce significantly faster results using less computing resource compared to find, but requires the database to be updated regularly or else the results will be inaccurate and/or incomplete. Here’s an example of how to find our jpg files using the locate command:

Okay, let’s combine the find command we used before with xargs to quickly remove the jpg files:

In this example, the find command searches through my ~/music directory and pipes to xargs a list any files ending in “.jpg”. The xargs command then splits this list into sub-lists and calls the rm command once for every sub-list. The -print0 option in the find command prints the full file name on the standard output followed by a null character. This allows file names that contain newlines or other types of white space to be correctly interpreted xargs when it uses it’s corresponding -0 option. Using xargs is more efficient than this functionally equivalent version of the find command, which must call rm once for every single file it finds:

Want to copy these jpg files to another directory instead removing them? The following two examples demonstrate how xargs can be used to accomplish that:

In the second example, the -I option tells xargs to replace the string {} with the argument list from the find command, in this case our list of jpg files. Note that not all versions of xargs support the {} syntax. No worries though, in those cases you can specify any string you’d like after -I; for example, the following variation replaces the string {} with x and will work just as well:

Here’s another use for xargs – systematically setting permissions for a large number of directories or files. When assigning reasonably secure permissions directories and files it’s common to give directories a permission of 755 and files a permission of 644. Since the command we’d normally use in this situation – chmod [some permission] -R /path/to/some_directory – will assign the same permission level to the directory and the files, let’s use xargs to assign permissions selectively:

Using this approach, for example, we could set all the mp3 files in ~/music to read-only so that an application or script doesn’t accidentally overwrite their tag metadata:

To verify that the permissions were set correctly let’s pass ls -l to xargs:

There ya have it. A couple of examples of how to use the xargs utility, one of the most useful and the most underappreciated utilities in *nix toolbox.
BSD

Configure FreeNAS To Be Your Subversion Repository

Recently I had the pleasure of building a Network Attached Storage (“NAS”) server based on FreeNAS. Since then, this device has more than fulfilled my initial requirements for reliable file storage and media server in my network. In a previous post, I described how I configured FreeNAS to store web files and serve as a document root for the Apache http server implemented in my Ubuntu server. Using a similar approach, this post will describe how I configured FreeNAS to host my Subversion (“svn”) repository.

Software versions used in this post were as follows:

  • FreeNAS v0.7.1 Shere (revision 5127)
  • Ubuntu Server v10.04 LTS (x64)
  • Subversion 1.6.6dfsg-2ubuntu1
  • nfs-common v1:1.2.0-4ubuntu4
  • portmap v6.0.0-1ubuntu2

Configuring the FreeNAS Server

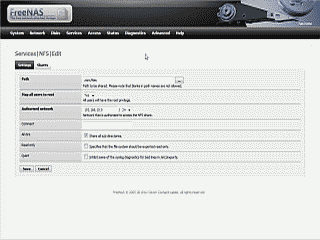
I began by creating the directory svn on /mnt/files, an existing mount point on my FreeNAS server. This directory would serve as the location for my svn repository. Then I enabled the Network File System (“NFS”) service so that /mnt/files/svn could be accessed from the Ubuntu server. To do this, navigate to Services->NFS->Settings and make sure that the check box for enabling NFS is checked and specify the number of servers that will run (the default value of four should easily handle dozens of users). Now select “Save and Restart.” Next, navigate to Services->NFS->Shares and select the “+” icon, where you are presented with the configuration screen for creating a new NFS share. Enter the path to be shared; the network that is authorized to access this shared path; and, make sure that the “All dirs” checkbox selected. The remaining options can retain their defaults (See Figure 1). Now select “Add” then “Apply changes.”

Screenshot of NFS shared path configuration in FreeNAS

Figure 1

Configuring the Ubuntu Server

In order to mount the NFS shared path without error, I needed to add a couple of packages. The nfs-common package is needed when a host acts as an NFS client, and includes a number of processes that ensure a particular NFS connection is allowed and may proceed. Also, because NFS relies upon remote procedure calls to function, the package portmap is needed in order to map RPC requests to the NFS service:

After these requisite packages were added, I created a directory to mount the NFS shared path. In this command, you must include the IP address of the FreeNAS server as well as the path to the directory created on it previously:

Then I made sure the permissions for this directory were set correctly:

Next, I added the following lines to /etc/fstab in order for the shared path to mount automatically at boot time:

Then I installed Subversion. The Subversion package for Ubuntu includes the Subversion client, tools to create a Subversion repository (svnadmin), and a custom protocol to make the repository I create on FreeNAS available over my network (svnserve):

And created an svn repository at the root of the shared path:

Next, I removed anonymous access to the repository and established write privileges for authenticated users. To do this, open /media/svn/conf/svnserve.conf and uncomment the following lines (Note: The svnserve.conf file is sensitive to white spaces, so make sure to not leave a space preceding the line when removing the hash (#) symbol):

Then I added myself as an authenticated user to the /media/svn/conf/passwd file:

I plan to use svn’s custom protocol for access to the repository so I need to start the svn server. One way to start it is to use the svnserve command:

However, I wanted the svn server to start up at boot time, as well as have stop and restart capabilities while it was running, so I created the following simple init script:

To use the script, I saved it to my home directory as svnserve and made it executable. Then moved it to /etc/init.d:

Then added the svnserve script to all of Ubuntu server’s multi-user run levels (2-5) and started the svn server:

Now, if for some reason the Ubuntu server is rebooted, the svn server will fire up automatically.

With the svn server now running, I created a root-level directory in subversion for a project called “code”:

After creating the project in subversion I can now use the standard svn commands or applications such Tortoise, RapidSVN and others to checkout the project or otherwise interact with the repository.

Conclusion

This concludes the post on how to configure a FreeNAS server for use as an svn repository. Sure, I could have installed the subversion package directly on FreeBSD, the underlying operating system for FreeNAS, but that approach adds processes that are not native to the FreeNAS implementation. By using the approach outlined in this post, I was able to place the repository on a solid, reliable and centralized storage system, and provide good logical and physical separation between the svn repository and the svn server functionality.

References

http://tldp.org/LDP/abs/html/abs-guide.html

https://help.ubuntu.com/community/Subversion

BSD

Configure FreeNAS To Store Your Apache Web Files

(20140208 – This post has been amended to provided an updated version of the Apache directive — iceflatline)

Over this past summer I had the pleasure of cobbling together a few spare parts in order to build a Network Attached Storage (“NAS”) box based on FreeNAS. This device has more than fulfilled my initial requirements for reliable file storage and media server in my network. This post will describe how I configured this FreeNAS box to store web files and serve as a document root for the Apache http server implemented in my Ubuntu server. This approach places my local web files on a solid, reliable and centralized RAID 5 disk storage system, and provides good logical and physical separation between file storage and file server functionality.

The versions for the software used in this post were as follows:

  • FreeNAS v0.7.1 Shere (revision 5127)
  • Ubuntu Server v10.04 LTS (x64)
  • Apache v2.1.14
  • nfs-common v1:1.2.0-4ubuntu4
  • portmap v6.0.0-1ubuntu2

Configuring the FreeNAS Server

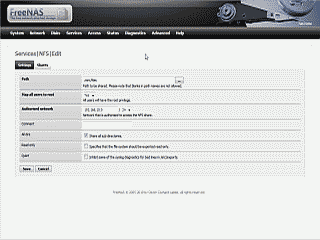
I began by creating the directory www on /mnt/files, an existing mount point. This directory would serve as my new Apache document root. Then, I enabled the Network File System (“NFS”) service in FreeNAS so that /mnt/files/www could be accessed from the Ubuntu server. To do this, navigate to Services->NFS->Settings and make sure that the check box for enabling NFS is checked and specify the number of servers that will run (the default value of four should easily handle dozens of users). Now select “Save and Restart.” Next, navigate to Services->NFS->Shares and select the “+” icon, where you are presented with the configuration screen for creating a new NFS share. Enter the path to be shared; the network that is authorized to access this shared path; and, make sure that the “All dirs” checkbox selected. The remaining options can retain their defaults (See Figure 1). Now select “Add” then “Apply changes.”

Screenshot of NFS shared path configuration in FreeNAS

Figure 1

Configuring the Ubuntu Server

To configure the Ubuntu server I needed to add a couple of packages in order to mount the NFS shared path without error. The nfs-common package is needed when a host acts as an NFS client, and includes a number of processes that ensure a particular NFS connection is allowed and may proceed. Because NFS relies upon remote procedure calls to function, the package portmap is also needed to map RPC requests to the NFS service:

Next, I created a directory so I could mount the NFS shared path. Here you must include the IP address of the FreeNAS server as well as the directory created on it previously:

In order for the shared path to mount automatically at boot time, I added the following lines to the /etc/fstab file:

I made sure the directory permissions were set correctly, and modified the owner and group associated with /media/www so that the Apache http server could access it:

Then edited the /etc/apache2/apache2.conf file, adding an alias for /media/www and a directory directive to the end of the file:

I created an index.html file and moved it to /media/www to test the above configuration, and made sure the file permissions were set correctly:

Finally, I restarted the Apache http server:

Conclusion

This concludes the post on how to configure a FreeNAS server as an Apache document root, providing a reliable way to store your web files, while at the same time utilizing the Ubuntu and Apache servers for what they do best – serving up those files.

BSD

Install and Configure Hamachi on FreeBSD

Update: Due to protocol changes instituted by LogMeIn on or around July 30 2012, the linux-hamachi client version referenced in the post can no longer be used to login to Hamachi servers. This post will be retained for archival purposes.

In this post I’ll discuss how to install and configure Hamachi and SSH on a machine running FreeBSD. If you’re not familiar with LogMeIn Hamachi (formerly known as just “Hamachi”), it is a hosted VPN service that is capable of establishing secure LAN-like links between computers, even if they’re behind Network Address Translation (NAT) devices. You can use it to create secure virtual networks on demand, across public or private networks.

In order for Hamachi to work, a “mediation server,” operated by the LogMeIn, is required. The mediation server stores machine nicknames, statically allocated 5.0.0.0/8 IP addresses and the associated authentication token of the user. Hamachi is free for non-commercial use. However, the Hamachi security implementation is closed source and as such is not available for review by the general public.

The versions for the software used in this post were as follows:

  • FreeBSD 9.0-RELEASE
  • linux-hamachi-0.9.9.9.20

Install Hamachi

Hamachi requires Linux binary compatibility which is not turned on by default in FreeBSD 8.2-RELEASE. The easiest way to enable this functionality is to load the linux KLD object (“Kernel Loadable Object”) by typing the following as root:

Then add the following line to /etc/rc.conf:

Now we’re ready to install Hamachi. If you’ve installed the FreeBSD ports collection then run the following as root to install the Hamachi port:

Otherwise you can grab the binary package and install it:

Now, let’s configure Hamachi and create our VPN. Hamachi requires the tap kernel driver to create and manage its virtual Ethernet network interface. No worries though, Hamachi adds the script /usr/local/etc/rc.d/hamachi that will automatically load the tap driver if_tap.ko. This driver must be loaded and running before starting Hamachi itself. You can have it load automatically when FreeBSD starts by adding the following line as root to /etc/rc.conf:

If you want only to run Hamachi periodically and not start the tap driver automatically at boot time, you can use forcestart/forcestop as root, which will ignore the setting in /etc/rc.conf:

Our next step generates the cryptographic key pair and creates a directory at ~/.hamachi where Hamachi will store these keys, as well as its configuration and state. This step only needs to be performed once per Hamachi install; however, it must be done for each user account that you plan to use Hamachi from, including root. Consequently, we’ll run the following commands from our user account:

Okay, now let’s start Hamachi. First, make sure the tap driver is loaded by rebooting the machine (assuming the hamachi_enable=”YES” line is in /etc/rc.conf as described above) or by using the forcestart command, then:

When Hamachi is run for the first time, the Hamachi daemon stays offline. Let’s bring it online:

Next, create a nickname for the FreeBSD machine so that we can identify it easily from another machine on your Hamachi VPN:

Now, let’s create our Hamachi VPN. In this step you’ll need to enter a unique name for your network as well as a password for it. If your network name is already in use somewhere you’ll need to keep trying until you land upon one that’s unique. If you’ve setup a Hamachi VPN previously and simply want to add your FreeBSD machine to it, then substitute join for create in the following command:

Now let’s put the FreeBSD machine online on the VPN:

That’s it. Your Hamachi VPN should now be up and running with your FreeBSD machine added as one of the hosts. What if we reboot, do all these commands need to be entered again? The answer is no. Once the Hamachi VPN is created/joined, the nickname established, and the machine added with the go-online command, should you need to reboot your box, you can simply restart the tap driver (assuming you elected not have it start automatically) and then start Hamachi, you’ll then be back online. However, you can also have Hamachi start automatically at boot time by adding a shell script in your system startup sequence. You will of course want to have the tap driver start automatically as well for this to be of any benefit. Here’s a generic version of the script I use:

To use this script simply add your account user name, save it as hamachi_start.sh in /usr/local/etc/rc.d/ and make it executable. You’re free to choose a different name, however, note that scripts within /usr/local/etc/rc.d/ are executed in lexicographical order. Since it is desirable that the existing script hamachi start first in order to load the tap driver, you should name the hamachi start script something that will ensure it starts after hamachi. Numbers may be used as a prefix to the filename.

You can display the status of the Hamachi daemon at any time by running the command hamachi without any arguments:

The following commands will retrieve the nicknames and print a list of the hosts that are currently members of your Hamachi VPN, as well as their Hamachi IP addresses (you will not see the machine you issued the command from listed):

And if needed, you can stop Hamachi with the command hamachi stop:

Now then, to initiate a terminal session with another host on your Hamachi VPN:

If this is the first time connecting, you’ll likely receive a warning concerning the authenticity of the host you’re trying to reach along with a fingerprint of its public RSA key, and asked if you’re sure you want to continue connecting. Accept by typing yes and you’ll be presented with the login and password prompt (this warning prompt will only occur once per machine). The public key from the remote host will be stored in ~/.ssh/known_hosts. If you don’t want to have to remember the Hamachi IP address each time you want to run a session with another host, simply add this IP address along with a name (e.g. home-server-ssh) to your hosts file (/etc/hosts). Next time you use Hamachi/SSH to connect to this host, use the name instead of the IP address and the host file will resolve the IP address for you.

SSH Server

Now that we’ve installed Hamachi, created or joined a VPN, and perhaps tested it by connecting to another host on the VPN. Let’s make sure there’s a running SSH server on our FreeBSD machine so that incoming SSH requests can be answered:

Should you need to install sshd, type sysinstall. Select Configure ->Networking and select sshd from among the options. Make sure sshd enabled by checking the /etc/rc.conf file for the line sshd_enable=”YES”. This will load sshd the next time your system starts. You can also start sshd manually as root through the /etc/rc.d/sshd script:

Conclusion

This post described how to install and configure Hamachi on a machine running FreeBSD. The reason I like using LogMeIn Hamachi is that it allows me to connect via SSH, SCP or SFTP to my FreeBSD machine at home from essentially anywhere I have an internet connection without the need to make any changes to my router/gateway. To learn how to install and configure Hamachi on Linux or Windows machines, as well as how to improve the security of the connections over the Hamachi VPN using public key authentication, please see my previous post.

References

http://www.openssh.com/
http://www.freebsd.org/doc/en_US.ISO8859-1/books/handbook/