(20180430 — The steps in this post were amended to address changes in recent versions of software — iceflatline)
Recently I had the occasion to spin up a Ubuntu server Virtual Machine (“VM”) in VirtualBox on a Windows-based host machine. Those of you who have performed a similar excercise know that the default window size that VirtualBox provides to command-line-based VMs, like *BSD and Ubuntu server, etc., is rather small, somewhere in neighborhood of the standard VGA resolution of 640 x 480 pixels. Normally the fix for this, of course, would be to install what VirtualBox calls “Guest Additions,” which consists of device drivers and other applications that optimize the guest operating system for, among other things, the ability to enlarge the window size. However, getting Guest Additions to install and run properly on command-line-based guest VMs is a monumental pain in the ass. One work-around that seems to work fairly well is to switch the VM window to “scale mode” (View->Switch to Scale Mode or Host+C), resulting in what is essentially a magnified version of the window and its contents. An even better solution, in my opinion, is to configure the VM so that you can connect to it directly from the host machine using Secure Shell (“SSH”), giving you full control over the window and text size of the guest VM.
This post explains how to access a VirtualBox Ubuntu server guest VM from the VirtualBox host machine using SSH. It then goes on to explain how to accomplish the same task when using a FreeBSD guest VM. The software versions used in this post were as follows:
- FreeBSD 11.0-RELEASE
- Ubuntu Server 18.04 LTS
- VirtualBox 5.2.6
Let’s get started…
First, let’s add a new “VirtualBox Host-Only Ethernet Adapter” in VirtualBox. This new adaptor will allow us to enable a private network consisting of our host machine and our guest VM. The host can connect to any guest VMs configured to use this adaptor, and they can connect to each other, but nothing outside of this virtual network will be permitted access.
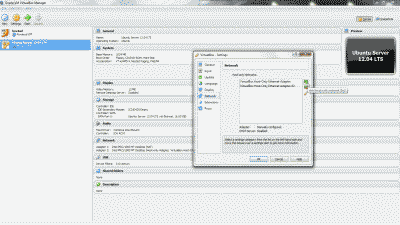
Navigate to Files->Preferences->Network and click on the “+” icon to add new adaptor. You’ll see that VirtualBox creates a new adaptor called “VirtualBox Host-Only Ethernet Adapter #2” (See Figure 1).
Right now you might be thinking “but couldn’t I just use the existing default VirtualBox Host-Only Ethernet Adaptor?” You absolutely could; however, setting up a second one allows you to customize it to your liking, leaving the default adaptor in its default configuration as a fallback.
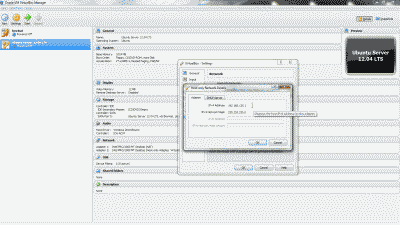
Now, double-click the new adaptor (or highlight it and select the edit icon) and note the IP address and subnet mask (e.g., 192.168.135.1 and 255.255.255.0) that VirtualBox has arbitrarily assigned under the “Adapter” tab. You may change these network parameters if desired, however, it is preferable to retain “1” as the value of the last octet in the IP address (See Figure 2).
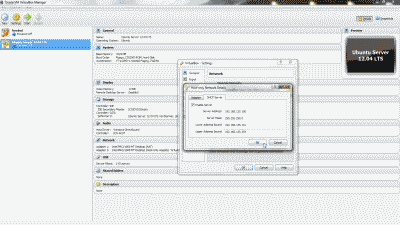
Optionally, you may configure a DHCP server on the VirtualBox Host-Only Ethernet Adapter #2 so that the guest VM obtains an IP address automatically at boot time. This can be accomplished by navigating to Files->Preferences->Network, double-clicking the new adaptor (or highlighting it and selecting the edit icon), selecting the “DHCP Server” tab and the selecting “Enable Server”. You’ll then need to modify the various DHCP server parameters (e.g., Server Address, Server Mask, etc.), keeping in mind that they should encompass the IP address configured for the adaptor, else the IP address should be modified so that it lies within the DHCP server parameters you’ve configured. When finished, select “OK” (See Figure 3). Note: I typically forgo using the DHCP server, electing instead to use a static IP address. That way, I can consistently use the same address each time I want use SSH to connect to the guest VM.
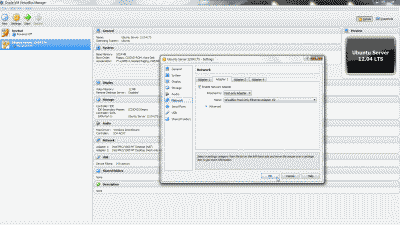
Let’s configure our Ubuntu server VM so that it will use the new VirtualBox Host-Only Ethernet Adapter #2. Shutdown the Ubuntu server VM if it’s running. Right-click on the VM and select Settings->Network. Select the “Adapter 2” tab, then select “Enable Network Adapter”. From among the options under “Attach to:”, select “Host-Only Adapter”, then select “VirtualBox Host-Only Ethernet Adapter #2” from among the options under “name:”. Now select “OK” (See Figure 4).
Now start the Ubuntu server VM. After the system has fully booted, login to the VM at the VirtualBox console window and execute the command ifconfig -a to list all network devices. In addition to your primary network device, enp0s3 (in this example), you should now see a second network device listed, enp0s8 (in this example). If you chose to setup a DHCP server when creating VirtualBox Host-Only Ethernet Adapter #2, then enp0s8 should already have an IP address assigned to it from among the pool of addresses you chose to use with setting up the DHCP server, in which case you should make a note of this address and use it to connect to the Ubuntu server VM using SSH.
If you elected not to setup a DHCP server when creating VirtualBox Host-Only Ethernet Adapter #2, then you’ll need to assign a static IP address to network device enp0s8. First, install the package ifupdown:
|
1 2 |
sudo apt-get update sudo apt-get install ifupdown |
Then open /etc/network/interfaces as the root user and add the following lines, making sure to change the values shown in this example so that they fall within the IP subnet parameters chosen when creating the new VirtualBox Host-Only Ethernet Adapter #2:
|
1 2 3 4 |
auto enp0s8 iface enp0s8 inet static address 192.168.135.100 netmask 255.255.255.0 |
Now start the interface so that it obtains the new network parameters:
|
1 |
sudo ifup enp0s8 |
At this point you should be able to connect to the Ubuntu server VM via SSH using this static IP address.
FreeBSD Guest VM
A similar approach can be taken for a FreeBSD guest VM. The setup and configuration of the VirtualBox Host-Only Ethernet Adapter in VirtualBox is identical to what has been described thus far for the Ubuntu server VM. However, in order to assign a static IP address to the new network interface, em1 in the case of FreeBSD, you’ll need to open /etc/rc.conf as the root user and add the following line, making sure to change the values shown in this example so that they fall within the IP subnet parameters chosen when creating the new VirtualBox Host-Only Ethernet Adapter #2:
|
1 |
ifconfig_em1="inet 192.168.135.100 netmask 255.255.255.0" |
Then restart the interface so that it obtains the new network parameters:
|
1 |
/etc/rc.d/netif restart em1 |
Conclusion
The default window size that VirtualBox provides to command-line-based guest VMs like BSD and Ubuntu servers is typically very small, resulting in a poor user experience for those administrators trying to perform work beyond just a few quick simple commands. Fortunately, VirtualBox can be configured so that the user can connect directly to a guest VM from the host machine using SSH, giving the user full control over window and text sizing.


